
photo shop_zps4e91b29b.jpg  photo about_zpsab9889c9.jpg  photo contact_zpsf03ef059.jpg  photo Untitled-2_zps43e03738.jpg
Showing posts with label nail varnish. Show all posts

Sunday, 24 February 2013

Red Dotty Nail Tutorial - A Guest Post from Artsy Angel


I have a very special guest post for you all today from one of my sponsors and also one of my fav bloggers Artsy Angel. Her blog is full of loads of colourful things, art and inspiration. I love love love the way she paints her nails, so I asked her to do a simple nail tutorial post for me based on her Blue on Blue nail art. I hope you all enjoy it!

What you'll need:
- 3 nail polishes. A main colour, a second colour and a colour for the middle dots. (I used a red, pink and an orange-y-pink,)
- a dotting tool or something to make the dots with (like a toothpick)
- Tape or nail stickers (this is the one I used)
- top coat

Tip: Examples of other colour combos; dark purple, light purple and a purple-e-pink for the middle. Green, blue and a teal for the middle. Orange, yellow and a peachy or creamy colour for the middle.
1. Paint your nails your main (red) colour.
Wait for your nails to fully dry before going to the next step.
2. Place your nail stickers or tape, around the half way mark on your nail. Paint them your second (pink) colour. Peel off the sticker or tape slowly.
Here are my nails after I took off my stickers. You'll see they are kind of messy and that is okay! The dots are going to hide any mistakes I make anyways so this part does not have to be perfect.
3. Take your time and start your first row of dots using your second (pink) colour. You want these dots to be above the line, make sure you are leaving enough room for the other rows of dots. 
If you're worried, do your middle (step 4) first and come back to this step after.
Tip: Make sure your nails are somewhat dry before starting your dots. You could even put on a layer of your favourite top coat to be safe.
4. Add your middle layer of dots using your third (orange-y-pink) colour. Make sure your dots are right on the line.
5. Add your last layer of dots using your main (red) colour. Wait for your dots to fully dry or you'll smudge your design. If you notice your dots are kind of big (theres a bump), give them extra time to dry.

Tip: To help speed up your dry time, place your finger tips n a bowl of really cold water or run them under the tap for a minute or two.

 
6. Finish off with a nice layer of your favourite top coat and you're done! :]


Monday, 5 November 2012

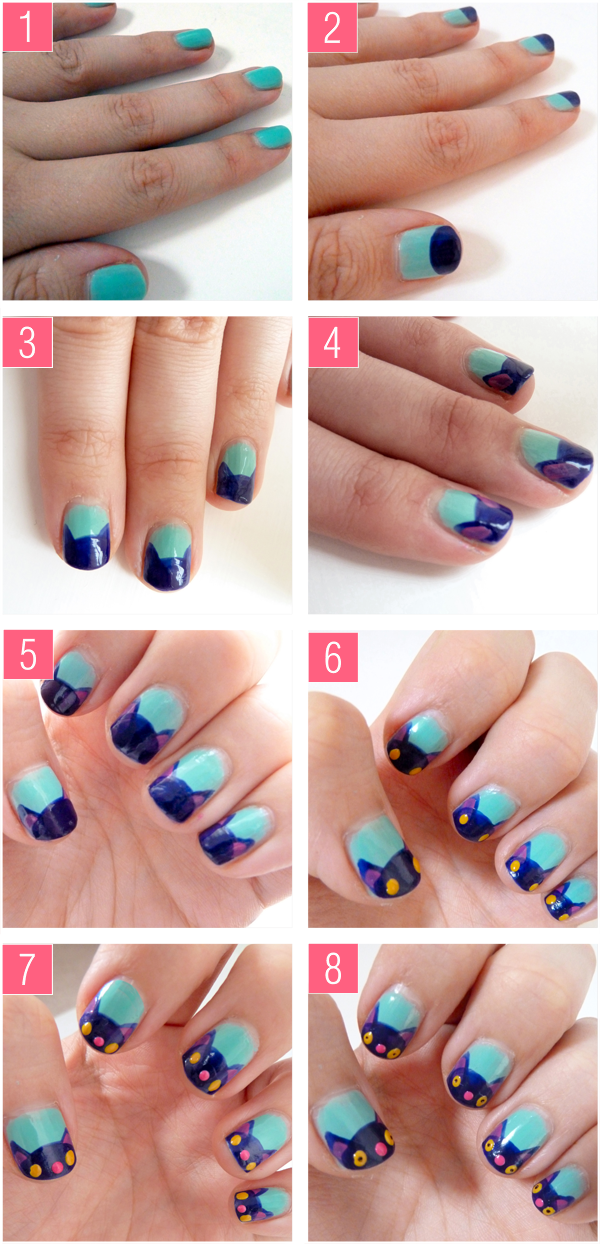
Pretty Kitty: Nail Art Tutorial


You will need:
Turquoise, dark purple (you can pretty much replace these with any colours you want), yellow & pink nail varnishes
A bobby pin
Black nail art pen

1. Paint your nails with the background colour
2. With your "cat" nail colour, paint the top third of your nail, make the edge rounded for the top of the cats head.
3. With the same colour, add some little triangular ears, extend them to the edges of your nails.
4. Add some little pink triangles for the inner ears, it dosn't matter is the pink extends on the cats ace area.
5. Apply another coat of "cat colour" on the top third of your nail, going over the bits of pink that went on the cat head.
6. Apply two dots of yellow for eyes using your bobby pin.
7. With your bobby pin, apply a pink dot in between the eyes to form a nose
8. Add some tiny black dots in the centre of the cats eyes to form pupils, and you're done!!

Tuesday, 9 October 2012

Mushroom Nail Art Tutorial

It's been a while since I've done a nail art tutorial, it's probably been almost as long since I've painted my nails! I'm aiming to post more of these over the next few weeks. I thought I'd get back into the swing of things by doing one of my favourite easy nail designs: Mushrooms.


You will need:
Green, red & white or cream nail varnishes
A hair grip with a small rounded end (like in photo 3)
A small black nail art pen or a black fine marker pen

1. Paint the bottom half of your nails green (This dosn't have to be very neat as the top half will be covered). Apply as many coats as you need.

2. Once the first step has dried, paint a cream or white fattish line down the centre of each nail.

3. Neatly paint the top half of your nail red, apply as many coats as needed and leave to dry.

4. Once the red has dried, dip your hair grip into the cream or white nail narnish and apply polka dots onto the red parts of the nail.

5. Paint little smiley faces onto the bottom of your white stripe of nails and your friendly mushrooms are finished! Add a clear top coat if desired.

Don't be afraid to play around with colours! Pink mushrooms with a baby blue background look pretty groovy too.


Sunday, 18 March 2012

A weekend of nail art!

This weekend I've been obsessing over painting nails. I seem to have about 10 million and one nail varnishes, so i figured I'd try out some creative ways to use them!

Last night I went out to celebrate my birthday, and of course a birthday night out isn't complete without beautiful nails! I followed this adorable nail tutorial that I found on The Make Up Box. It was really easy to follow, mine didn't look quite as neat as this though, i need to practice!!

While writing this, I'm half way through attempting this Mod Cloth tutorial. I can't believe how effective this looks! I'll post my results when I'm finished.


My next nail varnish attempt is going to be this jig jag nails tutorial from The Dainty Squid. I think it's going to be perfect for Easter because it looked like cracked eggs!


Sunday, 23 October 2011

Thursday, 29 September 2011

Adorable Bear Nails


Everyone likes a little pampering, especially us at PonyChops.  There is nothing nicer than having pretty nails, and with our easy to follow Bear Nails tutorial you can create adorable nails yourself.


We have used 6 different shades, but feel free to try different variations of colours, any nail varnish brand will do.


Have fun  :)