
photo shop_zps4e91b29b.jpg  photo about_zpsab9889c9.jpg  photo contact_zpsf03ef059.jpg  photo Untitled-2_zps43e03738.jpg
Showing posts with label nail tutorial. Show all posts

Sunday, 27 October 2013

Blogwatch - 27/10/13 - Halloween Crafts

It's Halloween really soon! So this week I'm sharing some of my fav Halloween tutorials from some awesome bloggers I've just discovered. I hope these crafts get you in the Halloween spirit!


I love these black cat nails by Beauty by Arielle. They look really effective and simple to do.


These cute spider cupcakes by HollyDays look too cute to eat. They're perfect for all year round too.


These pom pom spiders by A Pinch of Joy are a fun and easy craft to do. I love the spiders cute googly eyes.


I think these pumpkin balloons by The Celebration Shop are a genius idea.


This Halloween centerpiece by Lil Luna is so simple and striking. A perfect decoration for a Halloween dinner or buffet table.


I want to eat all these adorable spider cookies by Cake Whizz, they look so delicious.

Wednesday, 7 August 2013

Blog Watch 07/08/13

Now that I have a little more time to invest in my blog again, I want to start doing blog watches every couple of weeks again. I feel a little disconnected lately and I haven't been reading nearly enough blogs, so I'm hoping this blogwatch will help me discover new blogs and allow me to read more of my fav blogs too.

Do you have any exciting features coming up on your blog? Tell me about them, I may feature you on one of my blog watches :)


Kasia from Coeurs de foxes looks angelic in this beautiful, pale pink heart dress. I love the beautiful scenery in the background too.


Ginge from Cosmos and Crayons shows us how to paint BMO nails!!There are no words for how cute these are.


Becca from Ladyface shares her Lemon Blackberry cupcake recipe with us! It's vegan too! Yum.


Miss Billie Jean outshines Mickey with her flamingo inspired outfit in her newest outfit post.


Explorer Danny from Lady Explorers  shows us how to make a delicious watermelon t-shirt.


It's official, Nerd Burger had the coolest tattoos.


I'm not the only one with a new blog design, GypsyBeee has a beautiful new floral design. I think this fits in with her style so well.

Sunday, 24 February 2013

Red Dotty Nail Tutorial - A Guest Post from Artsy Angel


I have a very special guest post for you all today from one of my sponsors and also one of my fav bloggers Artsy Angel. Her blog is full of loads of colourful things, art and inspiration. I love love love the way she paints her nails, so I asked her to do a simple nail tutorial post for me based on her Blue on Blue nail art. I hope you all enjoy it!

What you'll need:
- 3 nail polishes. A main colour, a second colour and a colour for the middle dots. (I used a red, pink and an orange-y-pink,)
- a dotting tool or something to make the dots with (like a toothpick)
- Tape or nail stickers (this is the one I used)
- top coat

Tip: Examples of other colour combos; dark purple, light purple and a purple-e-pink for the middle. Green, blue and a teal for the middle. Orange, yellow and a peachy or creamy colour for the middle.
1. Paint your nails your main (red) colour.
Wait for your nails to fully dry before going to the next step.
2. Place your nail stickers or tape, around the half way mark on your nail. Paint them your second (pink) colour. Peel off the sticker or tape slowly.
Here are my nails after I took off my stickers. You'll see they are kind of messy and that is okay! The dots are going to hide any mistakes I make anyways so this part does not have to be perfect.
3. Take your time and start your first row of dots using your second (pink) colour. You want these dots to be above the line, make sure you are leaving enough room for the other rows of dots. 
If you're worried, do your middle (step 4) first and come back to this step after.
Tip: Make sure your nails are somewhat dry before starting your dots. You could even put on a layer of your favourite top coat to be safe.
4. Add your middle layer of dots using your third (orange-y-pink) colour. Make sure your dots are right on the line.
5. Add your last layer of dots using your main (red) colour. Wait for your dots to fully dry or you'll smudge your design. If you notice your dots are kind of big (theres a bump), give them extra time to dry.

Tip: To help speed up your dry time, place your finger tips n a bowl of really cold water or run them under the tap for a minute or two.

 
6. Finish off with a nice layer of your favourite top coat and you're done! :]


Monday, 4 February 2013

Little Mermaid Nail Art - A guest post for Of Corgis & Cocktails


A few weeks ago Katherine from Of Corgis & Cocktails asked me to do a Disney themed guest post for her. I'm pretty obsessed with my new I Love NP Little Mermaid nail varnish, so I thought it would be awesome to do a Mermaid themed nail varnish tutorial!

Sunday, 2 December 2012

Blogwatch #2


1. Annika from The Pineneedle Collective shows us how to make an easy and adorable heart skirt.

2. My Painted Bird shares more breathtaking photos of her adventures

3. Katie from Coeurs De Foxes shares her doll like outfit, teamed with her beautiful colourful camera.

4. How adorable are these Christmas themed wallpapers by Jessa at Pearl & Earl? Very.

5. Faith from Trail GRRRL always shares such gorgeous photos from her road trip around Yellowstone Park. These are some of my fav.

6. I'm very impressed with the dress that Lexie from Blue Wonderful made. She's a talented lady!

7. I'm so happy I came accross this blog. Linsday Louise from Hello, Mr Rabbit shares some gorgeous outfits.

8. One of my favorite mermaids, Kailey from Mermaidens shows us how to do simple pastel rainbow nails.

Saturday, 17 November 2012

Introducing Blogwatch

I tend to spend a lot of my time reading other peoples blogs, I find I get a lot of inspiration (let alone great shopping ideas) from them

So I thought I'd try and do a fortnightly post highlighting some of my favorite posts that I've read lately.


  1. Katherine from Of Corgis & Cocktails shows us how to paint our own Fox Nails
  2. Tottie from Pouting Penguin shows off her impressive leg tattoos
  3. Lauren from Old Red Boots shows us her new pom pom headband in a colourful and fun outfit post.
  4. Anne from Pony People counts her blessings and shares her amazing hand painted sofa with us. I need it in my house NOW!
  5. I love Karen from The Quiet Owl 's Princess Bubblegum costume! How wonderful is her crocheted head piece?
  6. Hannah from The Braided Bandet wows us with yet another gorgeous vintage outfit. I'm in love with the collar on this dress.
  7. Rae from Say It Ain't So has a talent for finding the cutest vintage items! I love this little deer tea pot.


Monday, 5 November 2012

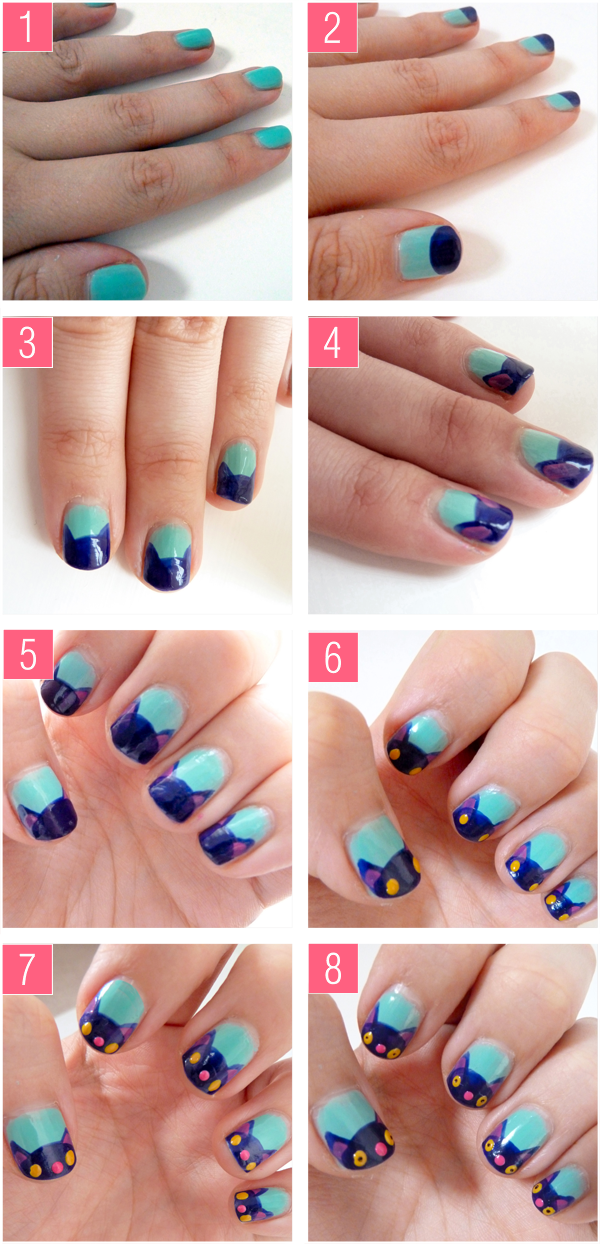
Pretty Kitty: Nail Art Tutorial


You will need:
Turquoise, dark purple (you can pretty much replace these with any colours you want), yellow & pink nail varnishes
A bobby pin
Black nail art pen

1. Paint your nails with the background colour
2. With your "cat" nail colour, paint the top third of your nail, make the edge rounded for the top of the cats head.
3. With the same colour, add some little triangular ears, extend them to the edges of your nails.
4. Add some little pink triangles for the inner ears, it dosn't matter is the pink extends on the cats ace area.
5. Apply another coat of "cat colour" on the top third of your nail, going over the bits of pink that went on the cat head.
6. Apply two dots of yellow for eyes using your bobby pin.
7. With your bobby pin, apply a pink dot in between the eyes to form a nose
8. Add some tiny black dots in the centre of the cats eyes to form pupils, and you're done!!

Wednesday, 17 October 2012

What I Wore #2 - Cats Brains & Clown Tights

I want to apologise for the poorly taken mirror photo! I had no one around to take photos all day, then when I ventured out of my cave I was in too much of a rush to get a friend to take photos.

Anyway, I'm pretty excited about this outfit! I bought the playsuit a couple of weeks ago and I couldn't be more in love with the pattern. It has little kitties & brains all over it, what's not to love about that?? I also love how the brains bit is kinda subtle too.


Playsuit: Drop Dead
Tights: Ebay
Shoes: Office
Cardigan: Marks & Spencer
Brooch: Thrifted
Watch: Gift

To find out how to do kawaii candy corn nails like mine, check out my guest post over at Grits & Moxie.

Monday, 15 October 2012

Nail tutorial guest post & the winner is

Well, the Young Explorer Stuff Giveaway has finished and I'm pleased to announce the winner is Katherine (creepmouse)! Well done Katherine!! I hope you love your beautiful brooch from Young Explorer Stuff.

I also wanted to tell you guys that I've just done a guest post over at Grits & Moxie on how to paint Kawaii Candy Corn Nails. Go check it out and have a go!


Tuesday, 9 October 2012

Mushroom Nail Art Tutorial

It's been a while since I've done a nail art tutorial, it's probably been almost as long since I've painted my nails! I'm aiming to post more of these over the next few weeks. I thought I'd get back into the swing of things by doing one of my favourite easy nail designs: Mushrooms.


You will need:
Green, red & white or cream nail varnishes
A hair grip with a small rounded end (like in photo 3)
A small black nail art pen or a black fine marker pen

1. Paint the bottom half of your nails green (This dosn't have to be very neat as the top half will be covered). Apply as many coats as you need.

2. Once the first step has dried, paint a cream or white fattish line down the centre of each nail.

3. Neatly paint the top half of your nail red, apply as many coats as needed and leave to dry.

4. Once the red has dried, dip your hair grip into the cream or white nail narnish and apply polka dots onto the red parts of the nail.

5. Paint little smiley faces onto the bottom of your white stripe of nails and your friendly mushrooms are finished! Add a clear top coat if desired.

Don't be afraid to play around with colours! Pink mushrooms with a baby blue background look pretty groovy too.


Sunday, 23 October 2011